|
I started undertaking the keg polishing project in February of 2008 and shared by results and process on Homebrewtalk as I went along. The thread grew to hundreds of posts and a lot of people were inspired to polish their kegs as well. Now that I've gone through a few different vessels, I'm putting this article together to share my process and some tips and tricks if you too want to require sunglasses to brew. By no means am I claiming to be a metal finishing expert or that my process is better than others. This article lays out how I do it and what I've come to learn about metal polishing in the process.
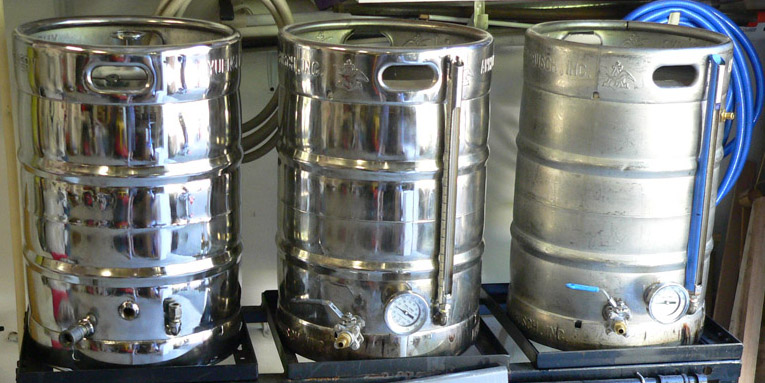
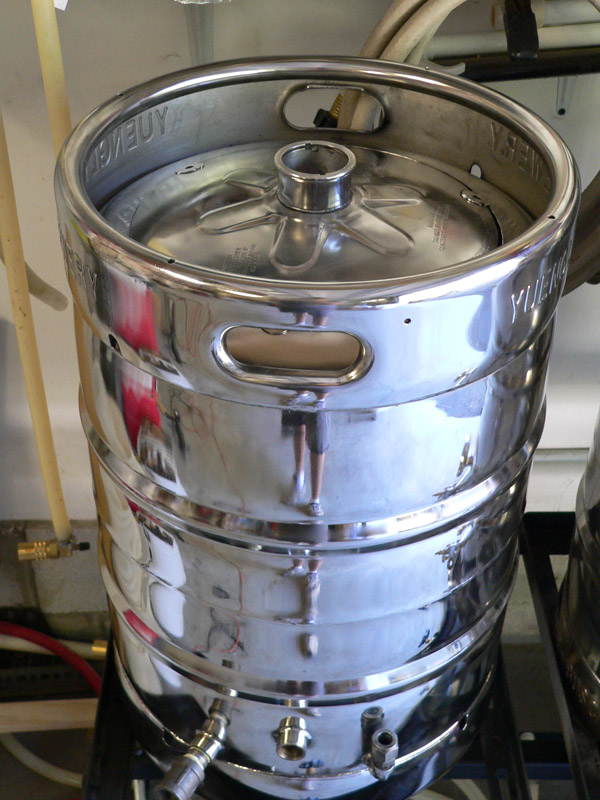
Before you decide to undertake this project, you may want to look closely at the vessels you're starting with. This takes enough time, effort and money that you don't want to polish up a severly damaged keg because polishing doesn't remove dents and you may not be happy with the results. If you want show-piece results, at least start with a keg that is generally straight with only surface gouges and scratches. If you're lucky, sometimes nearly new kegs end up in the scrap yard too. Bottom line is, if you're picking through a scrap bin of sanke kegs and have your choice between a newer looking dented keg or a scratched up undented, select the latter. The image on the right is what I started with. Most of them had the same level of wear but no real dents or deep scratches. The one with the paint on it was probably the newest and least scratched.
  You're going to need some specialty tools to get this done but the good news is that you probably already have a few of them from cutting the top out of your keg: You're going to need some specialty tools to get this done but the good news is that you probably already have a few of them from cutting the top out of your keg:
- 4.5" angle grinder. I have a Hitachi but just about any of them will do just fine. Even the Harbor Freight one might make it through a keg or two before burning up.
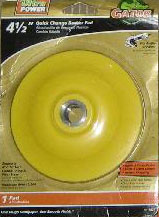
- Rubber backing pad. This threads directly on to the grinder's arbor (the threaded shaft) and supports the finishing/polishing pads. You likely have to remove both the positioning backup washer and the outer nut off the arbor of your grinder for this to thread on. Also, the nut that comes with the backing pad will have a different hole distance than the spanner wrench that comes with the grinder. No fear, you can tighten it enough with the flat of your gloved palm. It tightens more when you run the grinder.
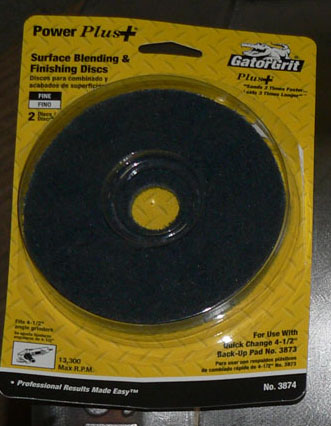
- Gator Grit Fine (and possibly Medium) Finishing Pads (two pack at Lowes for about $9). These are used to take away surface metal on your project so you can get down to the deeper scratches faster.
- Gator Grit Soft Polishing pads (two pack at Lowes for about $4).
- Task Force #2 and #5 polish sticks (these are in the tool section of Lowes but NOT near the polishing pads) The last two items are what take your smooth metal to a high luster shine.
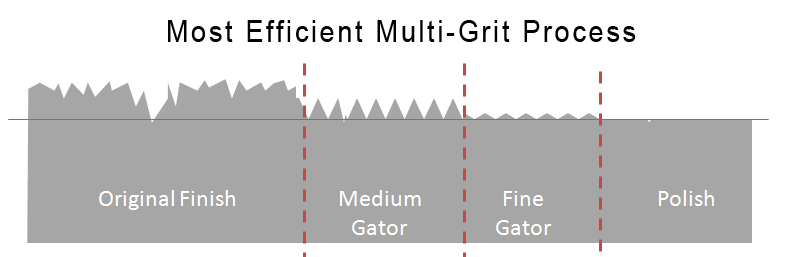
This is an important detail that you shouldn't skip over. Many people have tried to get a mirror finish only to be disappointed. There is a multi-step process that must be followed with no skipping around. You have to start with a coarse grit and work your way to a fine polish. How coarse you have to go will depend on how deeply scratched your metal is. Before I describe any more, the next drawing should help explain it well. (you can see a larger image by clicking on it
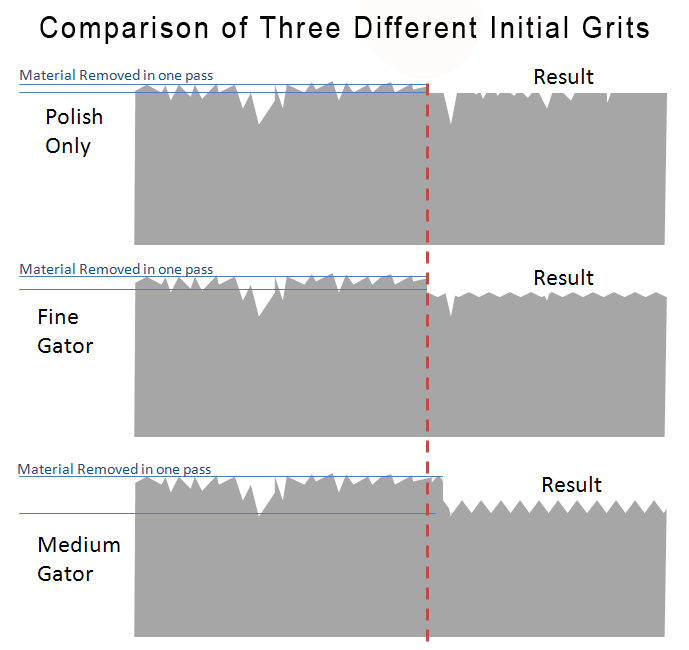
Each of the grey masses represents the surface of your project at a microscopic level. The left side represents the original condition of the metal surface, pitted, scratched, and jagged. The right side shows the resulting surface finish for each of three polishing steps after a reasonable length of time.
If you start with the polishing pad, you can see it will only remove the peaks on the surface but generally removing a very small layer of metal. Some areas become flat, and therefore very shiny. However, there are many deep scratches left. This would look good from a distance, but not like a show piece.
The next is what the "fine" Gator finishing pad would do on the original surface. It removes far more material than the polish, down to deeper scratches. You can see that it makes a more consistent finish, but it is by no means flat. The end result is described as clean and smooth to the touch, but with visual swirl marks and NOT shiny.
The last of the initial steps you might take is to go to the "Medium" Gator pad. On surfaces that are especially scratched up, this makes the quickest work of removing material down to the deepest scratch. The trade off for efficiency is that the resulting finish is consistent but very rough. You will absolutely think you've made a mistake by going this coarse because it will look less shiny than the project started with. Fear not.
|
|
Now that you understand what each of the steps would do to the original finish out of order, we'll talk about the step by step process and what it does in context of the drawing above. Understanding that the surface may need to get worse before it gets better, you start with the most aggressive grit that you need in order to get the deep scratches out first. If there are only a few isolated deep scratches on the surface, go ahead and work those areas only.
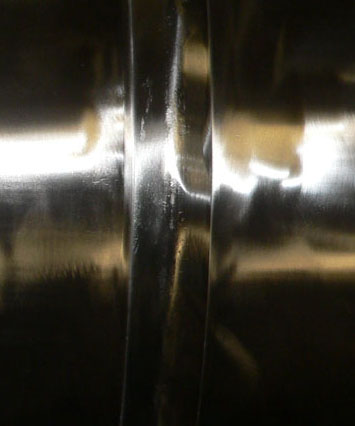 From there go to the Fine pad and work the entire surface. If you run perpendicular to noticeable scratches, you can easily see when you've gotten through enough metal to eliminate that scratch. If you get to a gouge that is taking too long to eliminate, you may want to circle it with a pencil and go back to those with the media pad. Both finishing pads will create new scratches and swirl marks but it's the nature of the polishing beast. You want to get out all the deep scratches as quickly as possible. One final pass with the fine pad using a lighter touch will buff some of the lighter scratches out that you've just created. Again, there will be no mirror surface but it will shine a bit. The picture on the right shows the result of the fine pad. Again, no deep scratches remain but it is swirled and patchy looking. From there go to the Fine pad and work the entire surface. If you run perpendicular to noticeable scratches, you can easily see when you've gotten through enough metal to eliminate that scratch. If you get to a gouge that is taking too long to eliminate, you may want to circle it with a pencil and go back to those with the media pad. Both finishing pads will create new scratches and swirl marks but it's the nature of the polishing beast. You want to get out all the deep scratches as quickly as possible. One final pass with the fine pad using a lighter touch will buff some of the lighter scratches out that you've just created. Again, there will be no mirror surface but it will shine a bit. The picture on the right shows the result of the fine pad. Again, no deep scratches remain but it is swirled and patchy looking.
|
|
Tips and Troubleshooting
 The most important thing I learned is that this is tedious boring labor. Don't think you're going to bang this out without preparation and commitment. If you lay a keg down in the garage and lean over to work on it, your back will be trashed before you get half way done. You can put two saw horses parallel to each other and throw a strap about them so they can't slide apart. Then you can lay the keg on top and it won't roll around. Most importantly, you bring the work up to chest height. The most important thing I learned is that this is tedious boring labor. Don't think you're going to bang this out without preparation and commitment. If you lay a keg down in the garage and lean over to work on it, your back will be trashed before you get half way done. You can put two saw horses parallel to each other and throw a strap about them so they can't slide apart. Then you can lay the keg on top and it won't roll around. Most importantly, you bring the work up to chest height.- Wear protective gear including goggles, a dust respirator and ear protection. Better yet, a pair of in-ear buds for your iPod puts you in a happy place and makes time go faster.You may also want to wear a hat because it is messy work and you'll end up with dust and polishing cast off in your hair.
- The pads should be relatively flat on the work, angled upwards just enough to keep the keeper nut from hitting the surface. If you work with the pad angle up too high, you'll wear out the pad quickly and even melt some of the backing pad onto the surface. If you get tough black smudges, you can wipe it off with a rag with paint thinner on it or carefully scrape it off with a razor scraper. You can also avoid the problem by let the pad cool off a bit every few minutes.
- Work in small sections at a time and attack it systematically. For example, work a single 4" x 6" area back and forth until it's done on one grit. Move over and do the next 4x6" area, etc. You'll never get a consistent finish if you randomly attack the whole vessel.
- Every time you change to the next finer grit step, it's best to wipe the whole surface down with a paint thinner-soaked rag to remove coarse grit and metal particles from the surface.
- It might be obvious, but the polish is applied to the soft pad by spinning up the grinder and holding the polish stick up against the pad briefly. Hold the polish firmly or it will fly across the garage.
- Once you get to the polish, the best results come from applying a pretty decent pressure to the point where the grinder slows down to about half speed. I know it sounds bad but it's what takes the orange peel surface down to a mirror. Keep applying more polish often. After some time, lighten the pressure and buff.
- For a typical Sanke 1/2 barrel keg, each of the four grit steps took me about 40 minutes or a total of about 3 hours with some breaks. Break it into a couple days if you want to.
|
Yes, I have about 6 hours invested into two kegs but the way I see it, I only had to sacrifice a single all grain brew day. The surface cleans up more easily in the polished state than the matte finish. After about a year, the finish will dull just a bit and can be rejuvinated by a very brief retouch with the #5 polish.
|
