 |
Cold crash what? It's the Cold Crash Guardian!
If you ferment in a temp controlled environment and enjoy the benefits of cold crashing, the inevitable problem is that the cooling in the fermenter creates a vacuum. The worst case scenario is that the liquid from your airlock or blowoff container gets sucked back into the beer and some portion of air from within the refrigerator is also drawn in. This has both contamination and oxidation effects on the beer even if you haven't noticed it yet. If you've jumped on the New England IPA craze, even tiny amounts of oxygen will destroy that beer, and to some degree all other beers.
There are finally increasing discussions being had on this topic and when it is brought up, those concerned are often told not to worry about it or offered solutions that don't really work. Scroll to the bottom to read about some of these misguided solutions. Some vendors are coming up with products but they are comparatively very expensive and most certainly do not reserve enough CO2. Do it yourselfers are experimenting with white bread bags and balloons, but they don't offer longevity or confident seals. In full transparency, we've also struggled with the materials**and design of this solution since we started working on it. We took some time off, worked on new prototypes and have come up with a version that should last a long time and deals with most challenges we came across.
What you get (at the moment the main product picture is not accurate though the video below IS):
This simple but effective kit includes your choice of either a 1 gallon or 2.5 gallon expandable bladder. The 1 gallon is suitable for up to 3 gallon batches while the 2.5 is suitable for up to 10 gallon batches.
The bladder has a valved hose connection.
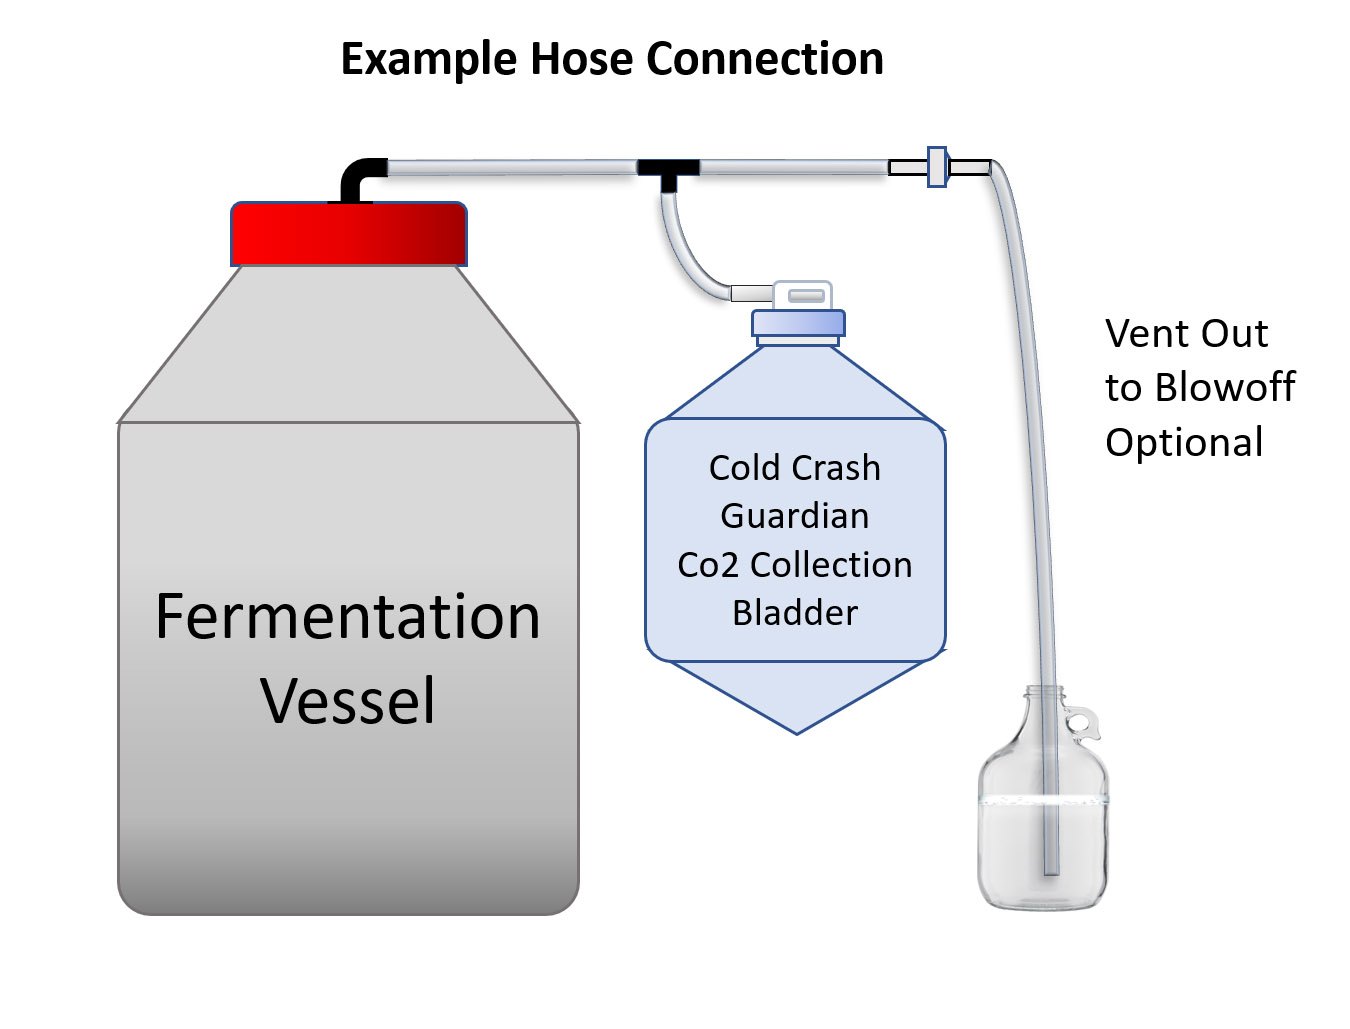
A nylon double sided 3/8" hose barb to connect your fermenter's grommet or carboy cap (you provide) to the included hoses that connect to the bladder as well as a blow off.
One barbed one way check valve. More on that below.
3 ft of 3/8" ID PVC tubing
3/8" hose barb TEE (stainless or nylon depending on availability)
In summary, the overall layout has a hose coming from your fermenter, splits via an included hose barb TEE. One port of the tee goes to the valved bladder input via a piece of hose. The other port of the tee goes to the one way check valve via a short piece of hose. Optionally a piece of hose can continue on into a jar of starsan (you can end the system at the one way check valve but you won't have any visual/audio indication of fermentation activity because nothing bubbles.
How it works:
First, you'll start your fermentation with a standard blow off hose if your fermenter type typically has yeast and chunkage blowing off. The cold crash guardian can handle some blowoff but it's a mess that can be avoided.
After the peak wave of fermentation is over, the krausen is diminishing, and the risk of blow off is over, you'll install the cold crash guardian to your fermenter's output with the collection bag completely deflated and the connect valve in the closed position.
Allow some time to pass, at least a minute or so, to allow the CO2 to purge the oxygen out of the lines. Then open up the valve on the collection bag. CO2 will start flowly filling the collection bag. Excess pressure is vented through the one way check valve. The check valve vents at half of a psi and if you attach a tube, you will see bubbles through the starsan in your catch container.
Once fermentation is over and you set your fermentation temp controller to COLD, the vacuum created in the fermenter will start to draw the CO2 out of the inflated bag as necessary. In most cases, the bag will deflate by approximately 1/2 to 1 gallon when the beer hits the mid 30F. As days pass at this cold temp, an additional gallon or so will be consumed. Due to the check valve's use, no starsan will draw up the tubing. More importantly, only CO2 will be drawn back into the headspace. Less oxygen ingress, no starsan, no bacteria.
CLEANING:
The unit only needs to be cleaned with soap and water internally if it has gotten physically fouled with yeast/blow off. This shouldn't happen when used as recommended. Take as much of the components apart as reasonable to clean and ensure that everything dries as quickly as possible. When cleaning the bladder bag, rinse any detergents out thoroughly. Try to prop the bladder open for draining/drying.
Sanitize the bladder and tubing with diluted star san directly before use and do not soak the components for more than a couple minutes. Long soaks will damage all the plastic components as expected.
Typical solutions offered on brewing forums:
I just plug up my fermenter so that the vacuum cannot draw anything in.
If your fermenter can hold up to the vacuum without damage or sucking your stopper down the hole, the problem is that you will eventually need to unseal it. Once the stopper is removed, oxygen rich air gets drawn in. Also don't discount how damaging vacuum can be. You can crease PET fermenters this way. You can also implode stainless tanks.
I just use an S-style airlock because it will pass gas both directions without draining starsan back in.
The only problem this prevents is the contamination of beer with whatever liquid you have in the airlock. It does not stop oxygen.
Who cares if Starsan is drawn into the beer, it's safe enough to drink.
There are endless safe things you can add to your beer that would make it taste bad. Stop.
I never had a problem with contamination or oxidation.
Some beers are more or less susceptible to off flavors/oxidation problems and some people have higher thresholds for detecting those problems. If you are completely happy with your beer despite less than ideal practices, this product is not for you.
I hook up my CO2 tank and set it to less than 1 PSI to push in CO2 when the vacuum is formed.
This is indeed how the pros handle it and of course it works. At a homebrew scale there are a few things to keep in mind. First you do need a CO2 tank, a good regulator that doesn't drift, and a fermenter that is 100% sealed. If you have even a slow leak in the fermenter seals, kiss that whole tank of CO2 goodbye. If your regulator drifts even a couple PSI (due to being borrowed out of your cold kegerator), you can compromise your fermenters due to overpressurization. If you have multiple fermenters in various locations, you'd need either multiple CO2 setups or long hoses.
**Transparency for V2: We're always striving to offer the best possible product designs and sometimes it doesn't always work out.
1. The cap connection between the bladder bag and the hose was soft plastic that eventually cracked for many people. We corrected this in V3 by using a much more robust cap made of thicker HDPE.
2. The 1 gallon bladder bag was occasionally not large enough for some situations and starsan was still sucked back into the beer. We fixed this with two changes in V3. First, we upsized to 2.5 gallon bladder capacity (1 gallon is still enough for 3 gallon fermentations or smaller). Second, we added the one way check valve. Even if the fermenter sucked every bit of CO2 out of the bladder, the check valve prevents star san from sucking back. You don't even need a hose after the check valve if you don't want one.
We have slowly rolled our V3 of this product because we've had issues with previous versions. As of January 2021, we have over 100 units in use for 3 months and 200 units in use for 1-2 months. We have not had even one report of any component cracking so we are confident in the expected lifespan of 1-2 years of moderate to heavy use.
|
|
|


 Cold Crashing Made Easy


 Good but damaged